

Aston Martin
V8 Vantage
THE STORY
This site is dedicated to Aston Martin V8 Vantage V28 CCC (previously CN06 VXY ) for all who choose to view
The objective is to provide a summary of my ownership & an insight into history
Aston V8 Vantage Clutch Change Detail
BACKGROUND
The clutch on CN06 VXY was an unknown quantity, in terms of its likely wear state and the associated risk of failure. Given this, I tried to establish if it had ever been replaced or was its 30K mileage all on the original unit. The dealer who I purchased from just did not know, so I searched for the previous owners details and emailed him, apologised for the intrusion and asked the question. Paul was indeed helpful, clearly still concerned with the ongoing wellbeing of his once beloved Aston. However, it was just not known if the clutch had ever been replaced.
This left the decision to replace the clutch being based on my desire to change out all wear related components on the Aston, complemented by the fact that the clutch operation was quite heavy and the bite point was quite low on the pedal, both of these elements seem to be generally regarded as a likely indicator of wear.
The Task Step by Step
1. Loosen NSF and both rear wheel nuts
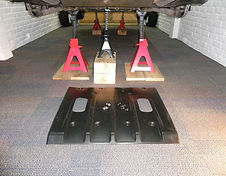
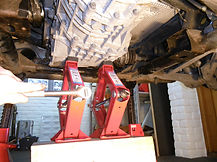
2. Jack up car and support Note: I used 600mm high stands
3. Remove rear wheels
4 Remove rear under panel
5. Remove cross beam that supports rear under panel
6. Drain transaxle oil – Note: This is not essential but does
reduce the transaxle weight by about 3KG and it will also
need changing if not done in the last 4 years
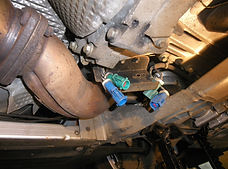
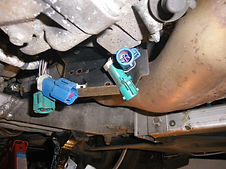
7. Undo exhaust sensor connectors on both exhaust cats
8. Undo front exhaust shield and brackets
9. Undo both downpipe clamps and remove pipe bracket
Note:The 3 studs on each exhaust flange were corroded
on my vehicle, I cleaned the threads with wire wool and wire
brush, soaked in penetrating oil first and applied spanner
pressure very carefully, however 2 of the 6 sheared. Aston
do not sell the studs separately, but BMW part number
21 51 1203012 for a M8 knurled bolt is an ideal replacement
in all respects once the broken studs are cut flush, drilled out
to 8.5mm and the new ones pulled in on their knurled splines.
(cobalt drill bits did this no problem, starting at 2mm and
working up to 8.5mm).Gaskets Aston Pt No 4G43-5E281-AA
at £20 & nuts 4G43-02738-AA at about £1.50 ea are required
10. Undo exhaust clamp brackets above rear subframe
Note:These bespoke bolts were slow to remove on my vehicle
and were slightly corroded, all 4 were replaced with
Aston Part No 4G43-70816-AA at about £2 each
11. Support exhaust, wobble exhaust free pulling complete
system from brackets and manifold downpipes onto supports
12. Undo exhaust rear heat shields
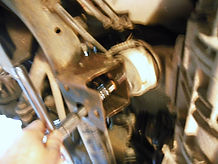
13. Mark flanges for alignment on both drive shafts and
release each drive shaft, supporting clear with cable ties.
Note: these bolts should be replaced with
Aston Part No 4G43-CD60-AD at about £2.50 each
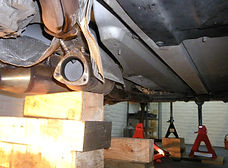
14. Lift complete exhaust clear of rear subframe and
manifolds and fiddle it free. Note: I found it easier to
remove the exhaust complete and then break the rear
section apart off the car, marking pipes to assist
alignment on refit. Manifold flange gaskets and nuts will
need replacing, Aston Part No 4G43-5E281-AA-PK at about
£20 for the pack of 2 gaskets and 4G43-02738-AA for the 6
nuts at around £3
15. Remove N/S/F road wheel, front panel plastic finishing
lip, mudflap, engine undertray and wheel arch liner
16. To assist with access to manifold studs remove silicone
emission pipes, cross brace, coolant tank and spark plug
cover - Note: this is not essential, however it gives better
access to the 8 x manifold nuts and is needed to facilitate
cleaning off the studs (which will be corroded) and then
removal of the nuts. It's essential to remove the N/S manifold
to give clearance for removing the torque tube later on.
Clean off N/S exhaust manifold studs - Note: suggest
penetrating oil overnight to assist
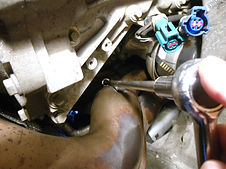
16. Undo (very carefully – these studs must not shear) 8 x
exhaust manifold nuts. Access is through the inner wing
access hole,from underneath (as per photo) and from the
engine bay access differing for the 8 nuts.
Note: these nuts will need to be replaced with Aston Part
No 69775 at about £4 for 10.
17. Remove the N/S exhaust manifold and its gasket.
Note: the gasket will need to be replaced with Aston Part No
6G43-35-10007 at about £8
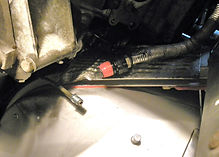
18. Disconnect the transaxle oil cooler flexible pipes and tie
away with cable ties
19. Remove central heat shield
20. Remove central support plate
21. Remove central exhaust support
22. Release transaxle earth straps
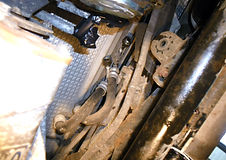
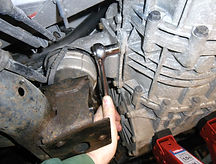
23. Loosen transaxle support mounting central nut
24. Support transaxle and torque tub. Note: I used a pair of
scissor jacks, in the absence of a transmission jack, this
facilitated fine adjustment for transaxle up / down movement
which is required for tasks such as gear cable releasing
25. Undo N/S and O/S transaxle support mounting bolts and
remove. Note: Replace the bolts with Aston Part
No 702210 – PK at about £6 for 10
26. Disconnect and plug slave cylinder hydraulic pipe
27. Remove transaxle breather pipe from retaining clip and
pull the plastic pipe off the brass spigot on the transaxle body
when sufficient access allows .
Note: I found the pipe difficult to remove and cut it at the
nearest point to the transaxle. There was in my case,
sufficient pipe remaining to allow reconnection at refitting.
28. Lower the transaxle in small increments to a point when
sufficient clearance just exists to facilitate gaining access for
removing the 2 gear select cables.
Note Do not lower the transaxle any further than to allow access
for releasing the gear select cables. If you lower the transaxle
further than that point the cable tightens against the bracket,
with potential for damage to expensive cables
29. Cut the cable tie on the reversing switch and disconnect
cable
30. Very carefully disconnect gear select cable end joints from
the crank arms.
Note these are push fit ball joints and need to be carefully
removed by uniform pressure from the underside, such that no
damage to the the rubber shroud takes place. There is an
Aston tool for this but I found that a slim 7/16th AF open ended
spanner fitted neatly under the ball joint levering it off the ball
without putting pressure on the inner rubber area.
31.Having checked the torque tube is still well supported undo
the torque tube to transaxle bolts and slide the units apart.
32. Drop the transaxle step by step, carefully supported and
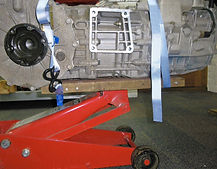
move clear of the vehicle. Beware its very heavy !
Note: This is ideally a 2 man job, though I was able to do
it by myself with the help of a solid piece of timber with a
large bolt through it to locate it centrally on the trolley jack
33. Loosen torque tube to engine bolts do not undo yet.
Note: These upper 40mm long flange bolts are very
difficult to access and they will need a good selection of top
quality, differing shape 13mm sockets / ratchet spanners /
ring spanners etc to remove. I replaced all with Aston Part
No 703192 at around £4 for 10. This was done not because
of corrosion but simply to ensure that these difficult to
access bolts were all in the best condition possible
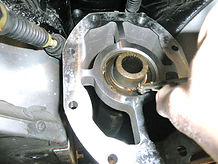
34. Undo torque tube outer (large) circlip only
35. Slide out central drive shaft.
Note this would initially not pull out however, inserting a
5mm head screwdriver into the groove on each side of the
shaft provided even leverage and it eased out perfectly
36. Support torque tube as required
37. Remove torque tube to engine bolts previously loosened
38. Remove flywheel inspection aperture cover
39. Lubricate the two alignment spigot holes on the torque
tube with penetrating oil
40. Remove torque tube by pulling away from clutch housing
and manouvering away from the engine by twisting.
Note this in my case would not initially break away from the
engine mating face, however a thin decorators putty knife
gently tapped in on either side in the area of the alignment
spigots gave the encouragement needed
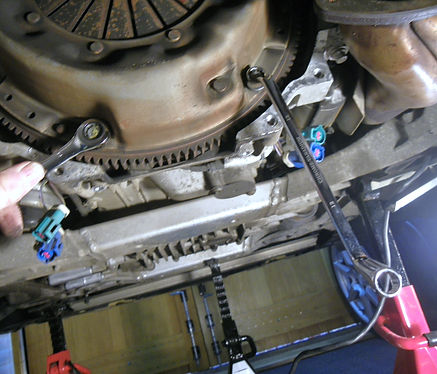
41. Slightly loosen, then undo the clutch cover retaining bolts
Note Aston do a special tool for holding the flywheel static, I
found that using a couple of pieces of 2.5mm twin and earth
electrical cable provided the perfect wedge between the
starter ring gear and the housing to hold the flywheel solid.
Replace bolts with Aston Part No 703186 at about £3 for 6
42. Lift clutch cover away to release clutch driven plate. The
clutch is now fully removed and can be replaced. The
flywheel should be checked for scoring, surface wear or
surface tempering and decisions around replacement made.
43. Re-assembly is broadly the reverse of the above
Footnotes:
-
In Completeing this task my approach was one of taking my time, which I indeed did, accruing a massive 40 Hours - the trade take 8 !
-
4 hours plus were consumed in simply getting the vehicle up in the air with 700mm supports at the rear and 600mm at the front.
-
I also removed some parts that were not totally essential to remove, this however improved acccess for me, so was in my view justified
-
The most difficult part was getting the manifold to engine nuts undone, followed by undoing the clutch bell housing top bolts
-
Given the vehicle was totally up in the air,I also took time to make many minor improvements and changes along the way
-
All nuts, bolts, screws, clips, etc encountered were replaced, though I have only listed part no's for the essential ones in the text
-
I have waited a year before writing this, so can indeed confirm that the clutch is light, bites smoothly near the top and performs superbly.
Non Standard Solutions:
1) The nuts securing the exhaust to the engine mounting studs were difficult to remove and
breaking a stud is just unthinkable to consider. Hence, in order to resolve this into the future
I recut the thread on the stud to remove the usual crud that forms on an exhaust stud. This
was done to each stud, simply by running a M8 x 1.25 die by hand pressure along the studs.
( £7.50 on ebay) With the stud threads then clean, I then secured the manifold by using M8
stainless steel connecting bolts Pt No 57562 from Toolstation at about £7 a pack. These nuts
are long enough to completely cover (and protect) the studs and as the studs are angled
downwards, there is also no risk of moisture retention from the open end. I re-checked the
torque after a couple of months - all was good.
2) A similar approach was used on the exhaust downpipe to cat joint, where in order to protect
the studs I used deep stainless steel dome nuts and again cleaned the threads with a 8mm die
on all bolts that had not been changed to the BMW ones mentioned in the text. This solution
looks a little unusual from under the car, but I hope that it will be appreciated when the
exhaust is required to be removed next time.
3) The breather tube to the transaxle was refixed with about 60mm of black heat shrink sleeving
on over the push on plastic tube, a tidy job and 100% secure

PREPARATION
Having searched out and read all of the info I could find about V8V clutches I found that they were usually A.P products faced with a Raybestos B8080-S lining but pretty well unique to Aston Martin due to the 26 spline, 1 & 1/16th inch shaft configurations. Given this, I decided to remove the clutch and then look at options. Though, given my very leisurely style of driving the Aston, I had already concluded that the sintered options were unlikely to best meet my needs.
John Price at Industrial Friction Materials in Cardiff assisted with the sourcing of an ideal material for my needs and was also able to provide me with a 0.4mm depth advantage over the original Aston material, the visit to Cardiff was indeed well worth while.
The general feeling among the Aston community was that it would be somewhere between impossible and very challenging to complete the task off the floor in my 8M x 3M home garage. However, I had already decided to go ahead, ignoring sensible folk, believing that given time, I would be able to complete the task and that became my mantra, take your time, do it once and do it right !
It had been many many years, 30 to be precise, since my last major car project, restoring a 3.8 E Type, so I knew that I would need to update my A.F socket set and invest in some new tools here and there. I had a fairly hefty trolley jack but also needed to top up my tool kit with the following:
* Heavy duty axle stands with minimum 600mm crutch height
* Ratchet spanner set, Ring spanner set, 3/8 metric sockets, 1/4 socket set, wobble bar extensions
* Snap on hex sockets in 8, 10 and 13mm (this selection will take most of the car apart and in hex rather than bi-hex form from an absolute top manufacturer, minimises any risk of rounding)
* 2 x Scissor jacks (for initial lifting of the car before getting the trolley jack under and for adjusting the level of the transaxle in a controlled way, given I do not have a transmission jack.
* Timber blocks for jacking from or blocking up (I used blocks from sawn down railway sleepers)
This all cost circa £300, but now I am all spared up for the the nuts and bolts of the metric world into the future


NOTE: This Page Is Optimised for Windows rather than ios, where some text alignment problems may be noticed